
Ever wondered how a guitar maintains its impeccable playability and stays in tune?
The answer lies within a small yet crucial component called the truss rod. The truss rod is a special mechanism that helps control the guitar’s neck curvature, ensuring optimal string height and overall performance.
In this article, we dive into the world of the guitar truss rod, exploring its purpose, function, and the impact it has on your playing experience.
What is a Truss Rod
The truss rod is a metal bar running through your guitar neck that helps your instrument resist the tension created by its strings. It is an essential component of a guitar neck, providing stability and control over the instrument.
Truss rods are made out of steel, but other materials like graphite can also be used.
By adjusting the truss rod correctly, you can set up your guitar for flawless playability and comfort regardless of any changes in weather or different playing styles.
How Does a Truss Rod Work
The truss rod works by adding or removing tension in the neck, which affects how it bows under the pull of the strings.
Tightening a truss rod gradually moves the neck away from a forward bow and towards a back bow. This can be helpful if you’re using heavier gauge strings that create more tension on the neck.
On the other hand, if you loosen your truss rod, it releases tension in the neck and gradually moves it into a forward bow. This can be useful if you’re using lighter gauge strings or have a playing style that requires less string height over the frets.
Overall, a truss rod gives you control over how your guitar sounds and plays by allowing you to adjust its curvature to match your preferences.
How does the truss rod impact the guitar’s playability?
The truss rod significantly impacts the playability of a guitar by shaping how the instrument feels and performs in the hands of a musician. By adjusting the truss rod, specifically the neck relief and string action, the guitar’s playability can be greatly enhanced.
Truss rod and the neck relief
To adjust neck relief, you’ll need to use your guitar’s truss rod – a key component in maintaining proper neck alignment. The truss rod essentially counteracts the tension from string pull that can cause a neck to bow forward or backward over time.
Having a properly adjusted neck relief is crucial for achieving optimal playability and sound on your instrument. When a guitar neck has too much relief, the strings will sit higher off the fretboard, making it harder to play cleanly and intonate correctly.
On the other hand, if there isn’t enough relief, the strings may buzz against frets when you play, resulting in an unpleasant sound. Finding the right balance of neck relief for your playing style and preferences can take some trial and error, but it’s well worth the effort.
Truss rod and the string action
The truss rod is an important factor in determining the height of your guitar strings above the fretboard, also known as string action. If the truss rod allows too much neck relief, the strings will be higher off the fretboard.
Contrariwise, adjusting the truss rod to create less relief results in a straighter neck and lower string action.
However, it’s worth noting that solely adjusting the truss rod won’t fully affect the action.
Achieving the desired string action requires a combination of truss rod and bridge adjustments. Properly setting the relief is crucial to finding the best playability and avoiding difficulties in achieving your desired action.
Truss rod and the intonation
The truss rod plays a crucial role in the intonation of a guitar. Intonation refers to the accurate pitch of each fretted note along the length of the neck. When the truss rod is properly adjusted, it helps maintain the correct amount of neck curvature, ensuring that the strings vibrate at the correct length when pressed against the frets.
This results in accurate intonation, where each note rings true and in tune across the fretboard.
If the truss rod is incorrectly adjusted, it can lead to intonation problems. For example, if there is too much neck relief, the strings may vibrate longer, causing the fretted notes to sound sharp.
Conversely, if there is too little neck relief, the strings may vibrate at a shorter length, resulting in the fretted notes sounding flat.
Do all types of guitars have truss rods?
Not all types of guitars have truss rods.
For example, most classical guitars don’t use truss rods because the tension created by the nylon strings isn’t as strong as that created by steel guitar strings.
You can tell if your guitar has a truss rod by checking at the end of the neck or near the pickups.
Typically, acoustic guitars provide access through the sound hole or on the headstock. Meanwhile, electric guitars may have access next to their pickups, such as in the Fender Elite Stratocaster model.
It’s important to note that not all guitars are made equal when it comes to truss rods. Some might have an adjustable truss rod, while others might have a fixed one.
Where is the truss rod on the guitar?
When it comes to accessing the truss rod on your guitar, there are a few different locations you may need to look for:
Truss rod locations behind the guitar’s nut
The truss rod can be accessed through a small hole located behind the nut. This is a common feature on most guitars, often covered by a small piece of wood or plastic, sometimes secured with screws.
Truss rod locations in the soundhole access
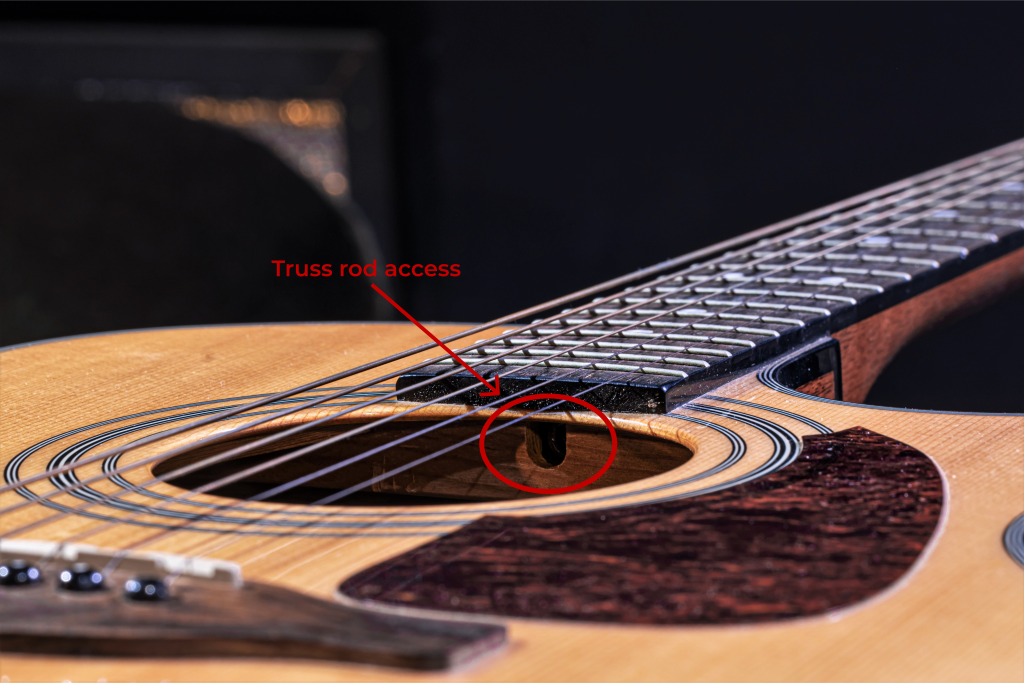
On older nylon-string acoustics like the Big Baby models, the truss rod can be accessed through the soundhole, just below the neck. While this feature can also be found on some modern acoustics, it is less common.
Truss rod locations on older Fender-style guitars
Fender guitars with a bolt-on neck require the prior removal of the pickguard to access the truss rod. Tension adjustments can then be made using a Phillips screwdriver.
Truss rod locations on newer Fender-Style guitars
In newer models, the truss rod is located behind the nut on the headstock. This type usually allows adjustments of around 1/8″ (3 mm) and can be made using appropriate tools.
Truss rod locations on Fender American Elite series
In this series, the truss rod entrance is positioned at the base of the neck, near the top of the instrument.
Truss rod locations on guitars with set neck
If your guitar has a set neck, you will find the truss rod located under a plate behind the nut on the headstock. Gibson or Epiphone guitars, for example, feature a signature bell-shaped plate covering the truss rod. Adjustment is done using a 5/16″ (8 mm) or 1/4″ (6 mm) hex adjustable truss rod nut, which can be turned with a hex box wrench.
Truss rod locations on acoustic guitars
On acoustic guitars, the truss rod can be accessed through three locations: under the guitar’s body, through the soundhole, or on the headstock. These locations typically require a 3/16″ (5 mm) allen wrench for adjustment.
Truss rod locations on modern guitars with bolt necks
Modern guitars with bolt-on necks also provide truss rod adjustment from the side of the heel. When facing the guitar from the body to the headstock, counterclockwise adjustments decrease truss rod tension (correct an underbow), while clockwise adjustments increase tension (correct an overbow). Special tools such as a hex nut or allen key are necessary for adjusting the bolt of a truss rod.

Main Types Of Guitar Truss Rods
There are three main types of truss rods: Single-action truss rods, Dual-action truss rods, and Dual-action truss rods.
Let’s explore them and see what are their pros and cons.
Single-Action Truss Rod (Compression Rod)
Single-action truss rods consist of a single piece of steel that helps alleviate the neck’s forward bow caused by string tension.
Single-action truss rods pros
A lightweight design and leaving more wood in the neck are two advantages of the single-action truss rod.
The compression rod can support the guitar’s neck without adding unnecessary weight.
This means that the guitar’s overall weight can be reduced, making it more comfortable to play for extended periods.
This can lead to a stronger and more stable instrument over time, as there is less chance of warping or damage occurring due to changes in humidity or temperature. Overall, these pros make the single-action truss rod an attractive option for guitar players who value both comfort and stability in their instruments.
Single-action truss rods cons
You may find it frustrating that the single-action option lacks forward adjustment and is more susceptible to changes in humidity than other truss rods. This means that if you’re experiencing issues with string buzz or fretting out, you won’t be able to make precise adjustments to the neck relief by turning the truss rod nut.
Additionally, fluctuations in humidity can cause the neck to bow or warp, negatively affecting playability and intonation. While some guitar players prefer the simplicity of a single-action truss rod system, it’s important to remember these limitations when choosing a guitar or making adjustments to your existing instrument.
However, with proper care and maintenance, even guitars with single-action truss rods can perform well and remain playable for years to come.
Dual-action truss rod (Two-way rod)
A dual-action truss rod provides more control over your guitar’s neck. The addition of a second rod allows for both concave and convex adjustments, giving you greater flexibility in shaping the neck.
However, this added complexity also means that adjusting a dual-action rod can be trickier than a single-action one, requiring more precision and care.
Dual-action truss tod pros
The Dual-Action Truss Rod, also known as the Two-Way Rod, is not dependent on wood density and allows for adjustments both forward and back. This feature makes it more stable than a single compression rod.
With its unique design, you can easily adjust your guitar’s neck relief in either direction, which ensures that your instrument maintains optimal playability and sound quality over time. If you want a guitar that will last for years without any issues, then investing in a guitar with a Dual-Action Truss Rod is definitely worth considering.
Dual-action truss tod pros
The Dual-Action Truss Rod adds extra weight to your instrument and requires more wood to be removed.
One of the most significant cons is that the adjusting nut is attached and cannot be replaced if damaged. This means that if the nut becomes stripped or damaged in any way, you’ll have to replace the entire truss rod system rather than just replacing the nut itself.
Additionally, because more wood needs to be removed to accommodate this type of truss rod, there’s a higher risk of weakening the neck and affecting tone quality. However, with proper care and maintenance, these cons can be minimized.
None-adjustable truss rod
None-adjustable truss rods are typically found on low-end guitars that are affordable for those just starting out.
While non-adjustable truss rods may have some benefits like lower cost and simplicity, they come with significant limitations that can impact your playing experience and overall satisfaction with your instrument.
None-adjustable truss rod pros
don’t require any adjustments or maintenance, making them easy to use and forget about.
None-adjustable truss rod cons
The downside of a non-adjustable truss rod is that it limits the potential for optimal playability and sound quality. Without the ability to adjust the truss rod, you’re stuck with whatever neck relief comes from the factory.
This can lead to issues like high action or buzzing strings, which ultimately affect the guitar’s playability and tone.
Additionally, if you live in an environment with fluctuating humidity levels, a non-adjustable truss rod can be particularly problematic as it can’t compensate for changes in tension caused by wood swelling or shrinking.
| Single-action truss rod | Dual-action truss rod | Non-adjustable truss rod | |
| Supports the neck | Yes | Yes | Yes |
| Neck Relief | Yes | Yes | No |
| Stability | No | Yes | No |
| Heavyeness | No | Yes | No |
| Can correct back bow | No | Yes | No |
How to adjust a truss rod
To adjust a truss rod, you’ll need a special tool that fits into the small slot at the base of your guitar’s neck.
First, loosen your strings to avoid any damage while adjusting the truss rod. Remember that tightening the truss rod will create extra pull away from the strings, whereas loosening it will allow for more tension from the strings on the neck.
If you notice a large bow on your guitar’s neck, it means there is too much tension from the strings and you need to tighten your truss rod.
Use your tool and turn it clockwise until you reach the desired amount of relief.
On the other hand, if you experience buzzing frets or find a back bow on your neck, then it’s time to loosen up that truss rod by turning it anti-clockwise with your tool.
Always make sure to re-tune after making any adjustments so that you can properly check for improvements in sound and playability.
We have prepared a very detailed guide on How to adjust guitar truss rod, so better check it out if you need more info.
Truss Rod Tools
You don’t want to be caught without the right tool when fine-tuning the truss rod.
Different guitars require different tools, so you need to make sure that you have the appropriate one for your specific model.
Using the wrong tool can result in stripping the nut and causing irreparable damage.
For guitars that use standard hex wrenches, ensure that you have the right-sized wrench. It’s better to take your guitar to a professional or order a set if you’re unsure about what size is needed.
For those guitars that require specialized cranks, make sure that you purchase one specifically made for your model.
Investing in the proper tools will not only save you from damaging your guitar but also ensure that adjustments are made smoothly and precisely.
Remember, taking care of your truss rod is essential for maintaining optimal playability and ensuring longevity of your beloved instrument!
Truss Rod Troubleshooting
If you’re having trouble turning your guitar’s truss rod, don’t panic – there are a few things you can try before giving up.
Fret buzz can be an annoying problem that affects the playability of your instrument, but fear not – with some adjustments to your truss rod, it may be possible to eliminate this issue and get your guitar sounding great again.
And if all else fails, you may be wondering whether it’s possible to replace the truss rod altogether – we’ll discuss whether this is a viable option for fixing your guitar.
How to turn the truss rod if it’s stuck
When your truss rod is stuck, first, make sure that you’re using the correct wrench size for your guitar’s truss rod. If the wrench is too small or too big, it won’t fit properly and won’t be able to turn the rod.
Additionally, check for any debris or dirt in the truss rod nut. Use a clean cloth or toothbrush to remove any buildup before attempting to adjust it again.
If none of these solutions work, take your guitar to a professional technician who can help you resolve this issue safely and effectively.
How to fix fret buzz
If you notice some annoying fret buzz, the first step is to check for loose or worn-out parts on your guitar, such as the bridge or nut. If you find any issues with these components, be sure to replace them.
If the problem persists after replacing any faulty parts, try adjusting your truss rod. A properly adjusted truss rod can help eliminate fret buzz by ensuring that your neck has the proper amount of curvature.
Remember that eliminating fret buzz requires patience and attention to detail. Take the time to diagnose and fix any issues with your guitar before resorting to drastic measures like filing down your frets or changing string gauges.
How to replace the truss rod (if needed)
Over time, the truss rod can become damaged or wear out completely, leaving you with an instrument that no longer plays correctly.
Fortunately, replacing a truss rod is a relatively straightforward process that can be done by most guitar players with some basic tools and knowledge.
To replace a truss rod, you first need to remove the old one from your guitar’s neck. This typically involves loosening the strings and then unscrewing any bolts or screws holding it in place.
Once removed, you’ll need to find a replacement that matches your guitar’s specifications and install it carefully according to manufacturer instructions.
While this may seem daunting at first glance, taking your time and following proper procedures will allow you to get back to playing without missing a beat.
Conclusion
As a guitar player, you have to ensure that your instrument is properly maintained and adjusted. Don’t be afraid to grab a trusty truss rod wrench and make those necessary tweaks to keep your guitar playing smoothly.
And if all else fails, don’t hesitate to seek professional help from a knowledgeable luthier.
FAQ
How often should a truss rod be adjusted?
We recommend adjusting the truss rod every 6-12 months. However, if you notice any changes in your guitar’s playability or intonation, it may be time for an adjustment.
Always use caution when adjusting the truss rod and consider seeking professional help if you’re unsure of what to do. Remember that proper maintenance will not only extend the life of your guitar but also ensure that it sounds its best each time you pick it up to play.

Thanks , I have recently been looking for info about this subject for ages and yours is the greatest I’ve discovered till now. But, what about the bottom line? Are you sure about the source?