
Are you an aspiring guitarist looking to get the most out of your electric guitar? One crucial aspect that many players overlook is the setup process.
Whether you’re a seasoned pro or just starting out on your musical journey, learning how to properly set up your electric guitar is an essential skill for any guitarist to master.
In this article, we’ll guide you through the steps necessary to perform a full electric guitar setup so you can improve your instrument’s playability, tone, and overall performance.
What is an electric guitar setup?
An electric guitar setup involves adjusting various components of the instrument to optimize its performance. This includes adjusting the truss rod to ensure proper neck relief, setting the action height for comfortable playing, intonating each string for accurate tuning across the fretboard, and checking the electronics for any issues.
A well-executed setup can make a world of difference in how your guitar feels and sounds, allowing you to play with greater ease and confidence. It’s important to note that while some adjustments can be made at home with basic tools, others may require professional assistance from a qualified technician.
Why do your electric guitars need setting up?
Your electric guitars need setting up to ensure optimal playability and sound quality. This is especially true for electric guitars, which are more complex than their acoustic counterparts.
Even if your guitar was perfectly set up when you first bought it, changes in temperature, humidity, and string tension can cause the instrument to fall out of tune over time.
But maintaining your guitar isn’t just about keeping it in tune. A properly set up electric guitar will also have a comfortable playing action (the distance between the strings and the fretboard), intonation (the accuracy of each note on each fret), and pickup height (the distance between the pickups and the strings).
Neglecting these aspects of your guitar’s setup can result in difficulty playing certain chords or notes, buzzing or dead spots on the fretboard, or an overall lackluster tone.
By taking the time to understand how to maintain your electric guitar’s setup, you’ll be able to get the most out of your instrument for years to come.
How do you know if your guitar needs a setup?
Your guitar needs a basic setup if you’re experiencing problems with your guitar, such as strings buzzing against the frets or difficulty pressing down on the strings.
Additionally, if your guitar sounds out of tune further up the fretboard or won’t stay in tune at all, it’s time to take action.
Keep an eye out for other warning signs like a dry and rough fretboard, a warped or bowed neck, crackling electronics, or even a broken string – these are all indications that your guitar is due for some maintenance.
Guitar Sounds Out Of Tune
If your guitar sounds out of tune as you move up the fretboard, it’s a clear sign that you have to correct intonation before you tune the guitar.
Guitar Won’t Stay In Tune
If your guitar won’t stay in tune and you’ve already checked and adjusted your nut, then the next step is to examine your tuning machines. Over time, these can become loose or worn out and cause problems when tuning your guitar.
Guitar Strings Buzz
A fret buzz usually occurs when the string height or action is too low. You’ll need to adjust the height of each string individually until you find the perfect balance between playability and buzzing.
It’s Hard To Press Down On The Strings
String height is something that varies from player to player, but if you find yourself experiencing discomfort or pain in your fingers after a short practice session, then it’s definitely worth considering lowering the action on your guitar.
The factory setup on a new guitar tends to have the action set a little higher than optimal for individual preferences, so it’s always recommended to have a brand-new guitar adjusted by a professional or knowledgeable friend.
Lowering the action can make playing much more comfortable and enjoyable, allowing you to effortlessly create beautiful music without worrying about strained fingers.
Fretboard Looks Dry and Feels Rough
You need to condition your guitar’s fretboard regularly to prevent it from drying out and feeling rough, which can cause discomfort and potentially damage the neck. When a fingerboard dries out, it loses its elasticity and becomes less structurally strong, making it more susceptible to warping or cracking.
This is particularly problematic if your guitar has a fretboard made of woods such as ebony, rosewood or Pau Ferro that require conditioning.
To properly condition your guitar’s fretboard, you’ll need some lemon oil or mineral oil.
The guitar neck looks warped or bowed
If your guitar’s neck looks warped or bowed, don’t worry – this issue can be easily fixed by adjusting the truss rod inside the neck. According to a survey, 40% of guitarists have experienced this problem at some point, which can cause discomfort while playing.
Crackling electronics
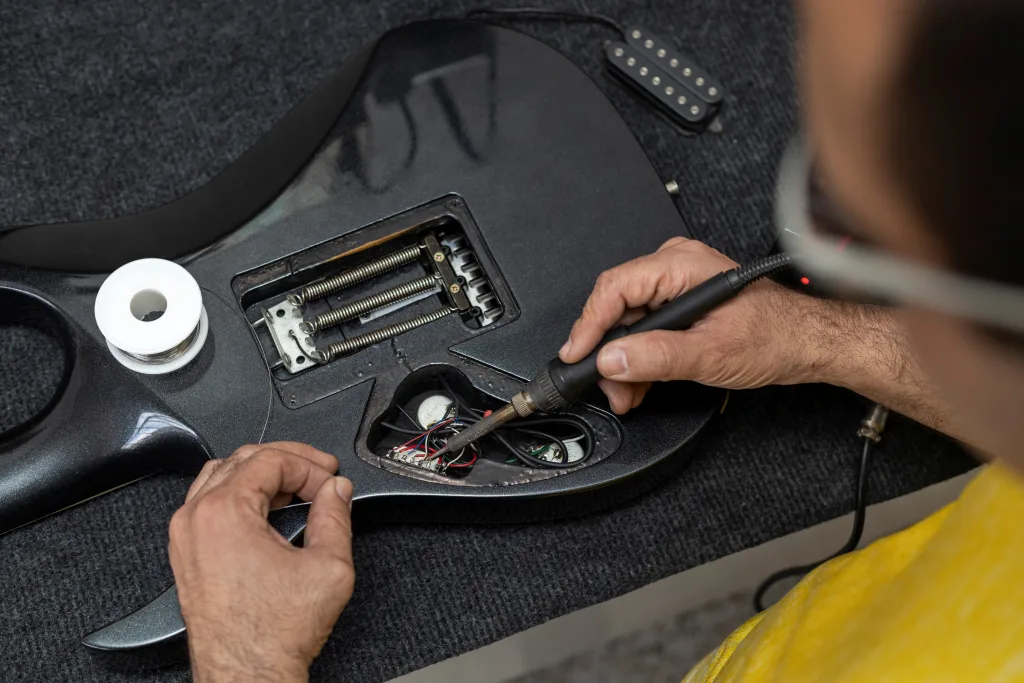
Experiencing crackling electronics on your instrument can often be resolved by using contact cleaner or replacing faulty components. Dust buildup inside the pots or selector switches is a common cause of this issue, which can easily be fixed with a spray of contact cleaner. However, if the crackling persists after cleaning, it may indicate that the component needs to be replaced.
Another potential cause of noisy electronics is dry or damaged solder joints. If you notice any loose connections or frayed wires, it’s important to address them promptly before they worsen and affect other parts of your guitar’s circuitry. With basic soldering skills and equipment, you can reflow any damaged joints and ensure that all connections are secure.
By taking care of these small but significant details in your guitar setup, you’ll ensure that your instrument sounds its best every time you play it.
Strings break
Strings can snap due to various reasons such as sharp edges on frets or bridges, a worn-out nut or tuning pegs, or even poor technique.
If you find yourself constantly breaking strings at the same spot, it’s crucial to identify and rectify the root cause.
Inspect your guitar for any sharp edges around the bridge or frets that could be causing friction against the string. If there are any visible sharp points, use a file to smoothen them out gently.
Similarly, check if there are any burrs on your tuning pegs that could be cutting into the string and replace them if necessary.
Additionally, dirt and grime buildup in the nut slots can also cause strings to break prematurely so make sure to clean them regularly with a soft brush or cloth.
By addressing these issues and practicing proper playing techniques like avoiding excessive bending or strumming too hard, you’ll be able to extend the lifespan of your strings significantly.
What tools do you need to set up your guitar?
Here are the tools you need to set up your new guitar:
- A set of screwdrivers – These will be used to adjust the height of your pickups, tighten or loosen screws on your tuning pegs, and more.
- A truss rod wrench – The truss rod wrench allows you to make adjustments to straighten out the neck as needed.
- String cutters – When it’s time to change your strings, you’ll want a good pair of string cutters handy for snipping off the excess length after they’re installed.
- A tuner – Whether it’s a pedal tuner or an app on your phone, having a reliable way to tune up is crucial for getting the best sound out of your instrument.
Once you have these tools on hand, it’s time to start setting up your guitar. Take things step by step and don’t rush – spending extra time making sure everything is just right will pay off in terms of better tone and easier playability.
Complete guide to setting up your electric guitar

Follow these steps, and you’ll have your guitar playing like a dream in no time!
Clean the fretboard and frets
Take a closer look at your fretboard and frets – they may be dirtier than you think, but with a little bit of cleaning, you’ll improve your playing experience immensely.
Dirt, sweat, and oil from your fingers can build up on the fretboard and make it difficult to move around quickly. Not to mention that dirty frets can cause string buzz or even affect intonation.
To clean the fretboard, first remove all the strings from your guitar. Then, using a soft cloth or an old toothbrush, gently scrub the fretboard with some lemon oil or guitar polish. Be careful not to apply too much pressure as this could damage your guitar’s finish.
After cleaning the fretboard thoroughly, wipe it down with a dry cloth to remove any excess oil or cleaner.
Next up are the frets themselves. Using some steel wool (preferably grade 0000), carefully rub each individual fret until any dirt or grime is removed. Again, don’t use too much pressure as you don’t want to scratch your guitar’s finish.
Once all of the frets have been cleaned in this way, wipe them down with a dry cloth before restringing your guitar.
Changing strings
When it’s time to swap out your old electric guitar strings, all you need is a fresh set, a string winder, and wire cutters to keep your sound crisp and clear.
Here are some steps to help you change them with ease:
- Loosen the current strings by turning the tuning pegs counterclockwise until they are slack enough to remove from the bridge.
- Remove the old strings from each tuner head by unwinding them from the pegs and then discard them properly.
- Insert each new string through its respective hole in the bridge and pull it up to its corresponding tuning machine.
Remember that when you replace one string, it’s best to change all of them at once for even tension across your neck. Take care not to over tighten or under tighten any of them so as not to damage your instrument.
Check your tuners
Make sure your tuners are working properly by checking for any looseness or stiffness before attempting to replace your strings, as this could affect the sound quality of your instrument.
Take a close look at each tuner and turn it gently to see if it moves smoothly. If you notice any resistance or grinding, try tightening the screw located on the back of the tuner with a small screwdriver. Be careful not to overtighten, as this can cause damage.
If you find that one of your tuning pegs is difficult to turn even after tightening the screw, it may need to be lubricated or replaced altogether. You can purchase guitar lubricant at most music stores and apply a small amount directly onto the gears inside the tuner housing.
If replacing the entire tuner is necessary, make sure to choose one that matches both the size and color of your existing tuners for a seamless look.
Remember, taking care of your tuners will help ensure that your guitar stays in tune longer and sounds its best every time you play it!
Check the nut
Check the nut on your guitar, as it can greatly impact the overall sound and playability of your instrument. The nut is the small piece located at the top of the fretboard that guides each string to its corresponding tuner.
If your nut height is too high or too low, it can cause issues such as buzzing or difficulty with holding down strings. To ensure that your nut is properly set up, here are some things you should do:
- Check for any cracks or chips in the nut. If you see any damage, it’s best to replace it.
- Make sure that each string sits snugly in its slot. You don’t want any wiggle room, but you also don’t want them too tight.
- Check that each string height is consistent across all slots. Use a ruler if necessary.
- Finally, make sure that the strings aren’t binding in the slots when tuning or playing. If they are, consider using some graphite lubricant to help alleviate this issue.
By taking these steps, you can ensure that your guitar’s nut is properly set up and ready for optimal playability and sound quality.
Lubricate the string contact points
To get the smoothest possible sound and playing experience, it’s important to make sure your strings glide effortlessly across the contact points – try lubricating them with graphite powder.
Start by removing each string one at a time and carefully inspecting the grooves in the nut for any rough spots or debris that might be causing friction.
Once you’ve cleaned out any dirt or grime, take a small amount of graphite powder and apply it to each slot using a soft brush or toothpick. Be sure to work the powder into the grooves thoroughly so that it coats both sides of each string.
After you’ve lubricated the nut, move on to the bridge saddles. These are the metal pieces that hold your strings in place on the body of your guitar. Like with the nut, debris and corrosion can build up over time, making it difficult for your strings to slide smoothly across them.
To clean these areas, use a cotton swab dipped in rubbing alcohol to gently remove any dirt or rust. Once they’re clean and dry, apply some graphite powder onto each saddle groove before restringing your guitar.
With these simple steps, you’ll be amazed at how much smoother your electric guitar will sound and feel!
Check the neck of the guitar
The neck of your guitar is a crucial component that affects the overall playability and sound quality of your instrument. Therefore, it’s essential to make sure that the neck is straight before proceeding with any further adjustments.
To check if the neck is straight, lay your guitar flat on its back with no strings attached. Then, hold down the first fret of one of the strings with your left hand and use your right hand to press down on the last fret.
Now, take a look at the gap between the string and each fret in between. If there is too much space or no space at all between any of these points, then chances are high that your guitar’s neck has a bow or warp. If you do find that there’s an issue with your guitar’s neck, don’t worry; this can be fixed relatively easily by adjusting either the truss rod or bridge saddles.
In some cases, it might require professional help, but for minor adjustments, DIY should be fine. Just follow these steps carefully and ensure that you have all the necessary tools before making any adjustments!
Adjust the truss rod
If the neck of your guitar has a bow or warp, fixing it can be done by adjusting the truss rod. The truss rod is a metal rod that runs through the length of the neck and is used to adjust its curvature.
To adjust it, you’ll need an Allen wrench that fits into the adjustment nut located at the base of the headstock.
First, loosen the strings on your guitar to reduce tension on the neck. Then, insert the Allen wrench and turn the truss rod nut clockwise to tighten or counterclockwise to loosen.
Make small adjustments at a time, checking for progress frequently by pressing down on each fret along the length of the neck and looking for any visible gaps between string and frets.
Remember, always make sure to re-tune your guitar after every adjustment until you achieve optimal playability.
Adjust the action
You want your guitar to feel comfortable and play smoothly, so let’s make sure the strings are at the right height by setting the action. Here’s how to do it:
- Start by measuring the string height at the 12th fret with a ruler or feeler gauge.
- For electric guitars, a good starting point is usually around 1.6mm for the low E string and 1.2mm for the high E string.
- Adjustments can be made by raising or lowering the saddles on each individual string.
Test out your new action by playing some chords and notes up and down the neck. If it feels too high, adjust accordingly until it feels comfortable to play without any buzzing or unwanted noise.
Keep in mind that lowering the action too much can cause buzzing as well, so find a balance that suits your playing style.
Set the intonation
Getting your guitar in tune is like aligning the stars – setting the intonation ensures that each note rings true across the fretboard. It’s important to understand that intonation refers to the accuracy of each note’s pitch as you play up and down the neck. Read more on “What is a guitar intonation?“.
When your guitar is properly intonated, open strings and higher frets should sound in tune with each other. To begin setting your guitar’s intonation, start by tuning it to standard pitch using a reliable tuner.
Then, play a harmonic at the 12th fret on any string and check its pitch against that same string played open. If there’s any discrepancy between these two notes’ pitches, adjust the saddle position for that particular string until they match perfectly. Repeat this process for all six strings on your guitar until every note rings true across all positions on the fretboard.
How often should you setup your guitar?
You should set up your guitar periodically to ensure that it plays and sounds its best.
Consider how often you play your guitar. If you’re a professional musician who plays regularly in gigs or recording sessions, you may need to get your guitar setup every few months or so. On the other hand, if you only play occasionally for fun or personal practice, then getting a setup once a year might suffice.
Besides, the type of climate and environment where you store and play your guitar can affect its condition and may require more frequent setups.
It’s important to listen to your instrument and pay attention to any changes in its playability or sound – this can be a good indicator of when it’s time for another setup.
Conclusion
Getting a proper setup is crucial for achieving the best sound and playability from your instrument. By following the basic steps outlined in this article, you can ensure that your guitar is properly adjusted to meet your playing needs.
As the saying goes, ‘Practice makes perfect.’ So don’t be discouraged if it takes you a few tries to get everything just right. With patience and persistence, you’ll soon find that setting up your electric guitar becomes second nature.
FAQ
What is the difference between a setup for an electric guitar and an acoustic guitar?
The difference between a setup for an acoustic guitar and an electric is that electric guitars often have adjustable bridges and truss rods that need to be adjusted carefully for optimal performance. On the other hand, acoustic guitars usually require more attention to their bracing and nut widths.
Is it necessary to change the strings before doing a guitar setup?
Before doing a guitar setup, it’s highly recommended to change the strings.
Old strings can be worn out and lose their tone, making it difficult to achieve accurate intonation and action adjustments. Additionally, new strings will provide a better playing experience and improve the overall sound of your guitar.
What are the most common mistakes people make when setting up their electric guitar?
There are a few common mistakes that people tend to make. One of the biggest is not properly adjusting the truss rod, which can lead to problems with intonation and action.
Another mistake is not checking the bridge height and saddle placement, which can also affect intonation and playability. It’s important to take your time and make small adjustments gradually, rather than trying to make big changes all at once.
Additionally, be sure to check for any loose hardware or electronics, as these can cause buzzing or other unwanted noises. By paying attention to these details and taking a patient approach, you’ll be able to set up your electric guitar for optimal performance.
How long does a typical electric guitar setup take?
The answer is that it can vary depending on a number of factors.
For example, if you’re experienced with setting up guitars and have all the necessary tools at hand, you may be able to complete the process in as little as 30 minutes.
On the other hand, if you’re new to guitar setup or don’t have all the required tools, it could take several hours or even days to get everything just right.
Ultimately, the key to a successful guitar setup is taking your time and being patient with each step of the process.
