
Are you struggling to play your acoustic guitar comfortably? Does it feel like the strings are too high or too low? If so, your guitar may need a setup.
A properly set up guitar can make it easier to play chords and notes, improve tone and sustain, and prevent buzzing or fretting out.
In this article, you can learn how to adjust the truss rod, bridge height, saddle, and nut of your guitar, as well as how to choose the right tools and maintain your instrument over time.
Whether you are a newbie or an experienced player, investing some time in setting up your acoustic guitar can make a big difference in your playing experience. Let’s get started!
What exactly does ‘acoustic guitar setup’ mean?
The acoustic guitar setup means adjusting the components of the guitar to ensure that it is comfortable to play, sounds great, and stays in tune.
A proper acoustic guitar setup includes adjustments to the neck, truss rod, bridge height, and saddle.
Why new acoustic guitars need setting up
New acoustic guitars often require setting up because larger manufacturers may prioritize speed over a careful setup.
Also, guitars can be affected by changes in climate during storage and shipping, and they may also settle and change over time.
Getting a professional setup allows the instrument to be customized to your specific needs, ensuring it plays and sounds its best.
Factory Setback
You might be surprised that many guitar manufacturers cut corners and rush through their factory work, leading to poor-quality instruments that can frustrate and disappoint even the most talented players.
Some of the most common issues with factory setups include uneven frets, high action, poorly cut nuts and saddles, and necks that are not properly adjusted.
Even if a guitar looks great on the outside, it may have underlying issues that affect its playability and tone.
A good setup can make a world of difference in how your guitar feels and plays and can help you get the most out of your instrument.
Level of humidity
Humidity can significantly impact the setup of an acoustic guitar, as it can cause the wood to expand or contract, leading to changes in neck relief, action height, and intonation.
In a dry environment, the wood can shrink, causing the neck to bow and the action to become too low, resulting in buzzing strings and poor playability. On the other hand, in a humid environment, the wood can swell, making the neck curve upwards and the action too high, making it harder to play.
To avoid these problems, it’s essential to store your guitar in a controlled environment with stable humidity levels. A humidifier or dehumidifier can help regulate the moisture content of the air and prevent damage to your instrument.
The impact of transport and storage times
When you purchase a new acoustic guitar, it’s crucial to consider the transport and storage times that it has gone through.
Most budget instruments are made in the far east and have to travel by cargo ship for several weeks before reaching the UK. During this time, the guitar’s components can shift and move around, affecting its geometry and playability.
It’s also worth noting that the conditions in which the guitar is stored can also impact its overall condition.
As we already mention, the humidity and temperature changes can cause the guitar’s wood to expand or contract, leading to changes in the neck’s curvature or the saddle’s height.
Therefore, it’s important to inspect the guitar thoroughly upon arrival and make any necessary adjustments to ensure that it’s in optimal condition.
How do you know if your guitar needs a setup?
You know your guitar needs a setup if you feel uncomfortable while playing or notice issues such as intonation problems, buzzing, or sharp fret edges.
If you’re experiencing any issues with your instrument, it’s recommended to have your guitar set up by a professional.
However, if you’re confident in your abilities and have the necessary tools, you can attempt to set up your guitar yourself.
Just be sure to follow instructions carefully and make small adjustments while checking frequently to avoid causing damage to your instrument.
Mastering the setup: Complete guide to setting up your acoustic guitar
A properly set up acoustic guitar is essential for achieving optimal playability, tone, and overall performance.
In this guide, we will take you step-by-step through the process of setting up your acoustic guitar, covering crucial adjustments such as string action, intonation, truss rod, and more.
Unpack and inspect the guitar
Start with the body of the guitar and make sure there aren’t any visible cracks, scratches, or dents. Check the fretboard for any rough or uneven spots that could make playing uncomfortable.
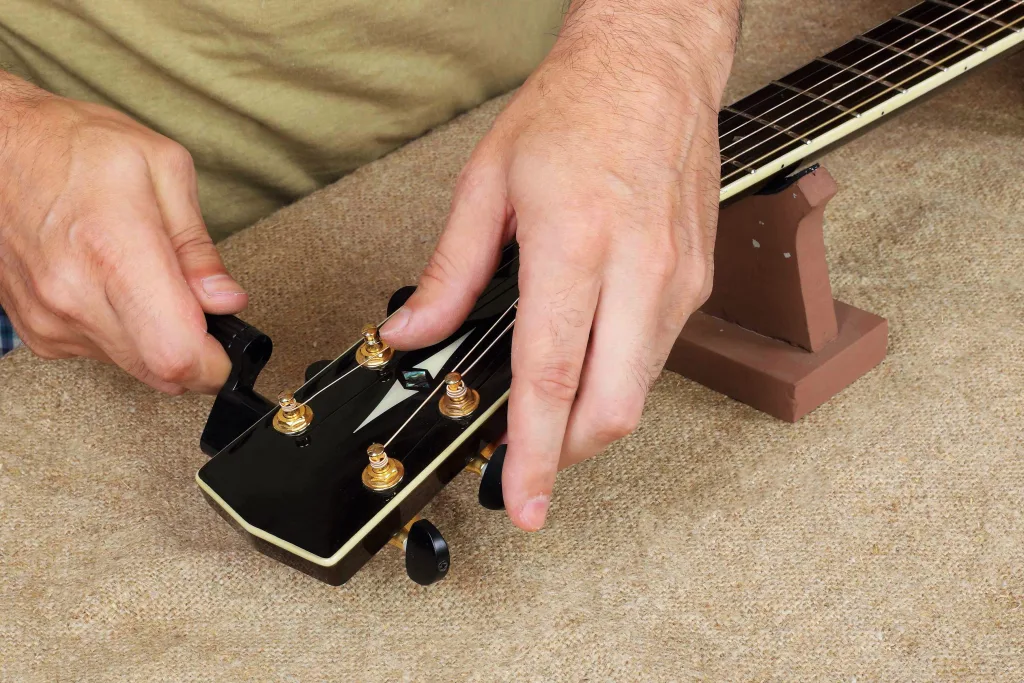
Take a look at the tuning machines and make sure they’re securely fastened and turning smoothly. Don’t forget to inspect the bridge and saddle for any signs of damage or wear.
Once you’ve thoroughly inspected the guitar, it’s time to remove it from its packaging and give it a quick tune.
It’s important to loosen the strings before removing them to avoid any unnecessary stress on the neck.
Once the old strings are removed, take the opportunity to give the fretboard a quick clean with a soft cloth and some lemon oil.
Then, carefully install the new strings and tune the guitar to the standard pitch.
Congratulations, you’re now ready to start the setup process and make any necessary adjustments for optimal playability and sound quality.
Check string gauge and tune up

This ensures that you have the proper tension on the strings and that they are in tune with each other, which is essential for good sound quality and playability.
Start by checking the gauge of the strings that came with your guitar. If they’re not the gauge you prefer, now’s the time to switch them out. Make sure to use a trusted brand and size of strings to avoid any issues with tuning stability or intonation.
Once you have the right strings, use a tuner to get each string in tune. Check the tuning of each string several times, as the tension on the neck and bridge can affect the tuning.
Adjust the truss rod
The truss rod is an essential component of your guitar’s setup, as it provides stability and maintains the proper relief in the neck. To adjust the truss rod, you’ll need to remove the strings and loosen the nut located at the headstock.
Use the appropriate tool, such as an Allen wrench, to turn the truss rod in the desired direction. If your guitar has too much relief, turn the truss rod clockwise to straighten the neck. If your guitar has too little relief, turn the truss rod counterclockwise to add more relief.
Be sure to make small adjustments and check the relief frequently using a straightedge and feeler gauges.
Adjusting the truss rod should be done carefully and gradually to avoid causing damage to your guitar. It’s also important to keep in mind that changes in temperature and humidity can affect the neck’s relief over time, so regular adjustments may be necessary.
If you’re unsure about how to adjust the truss rod properly, it’s recommended to seek the help of a professional guitar technician.
By taking the time to adjust the truss rod and maintain the proper relief in your guitar’s neck, you can ensure optimal playability and sound quality for years to come.
Check for high frets
Make sure to check for high frets on your instrument, as they can cause buzzing and affect playability. To do this, you’ll need a fret rocker – a tool that helps you identify any high frets on the neck. Simply place the fret rocker over each fret and see if there is any rocking motion. If there is, the fret is too high and needs to be adjusted.
High frets can occur due to a variety of reasons, such as changes in temperature and humidity, or simply from the wear and tear of playing. If left unaddressed, they can cause buzzing, intonation issues, and even string breakage. However, by identifying and addressing high frets, you can ensure that your guitar plays smoothly and sounds its best.
Adjust nut height & String Slots
The nut is a small piece of material located at the top of the guitar’s fingerboard, where the strings rest before they reach the tuning pegs. It’s important to adjust the nut height so that the strings are not too high or too low, which can cause intonation problems and make it difficult to play.
To adjust the nut height, use a set of feeler gauges to measure the distance between the bottom of the strings and the top of the frets at the first fret. This distance should be around 0.4-0.5mm for the bass strings and 0.2-0.3mm for the treble strings.
If the nut height is too high, it can be filed down slightly using a nut file until the correct height is achieved. If the nut slots are too deep, causing the strings to buzz or rattle, they can be filled with a small piece of bone or plastic and re-filed to the correct depth.
Another important aspect of nut adjustment is the string slots. These should be cut to the correct depth and width for each string to ensure proper spacing and intonation.
The slots should be slightly wider than the string to allow for easy tuning and should be cut to a depth that allows the string to rest just above the first fret. To check the slot depth, press down on the string at the third fret and check the distance between the string and the first fret.
If the string is too high, the slot may need to be deepened slightly.
If it is too low, the slot may need to be filled and re-cut to the correct depth. Adjusting the nut height and string slots can make a significant difference in the playability and tone of your guitar.
Check saddle curvature
The saddle is the small piece of material that sits on top of the bridge and holds the strings in place. It needs to be curved in two directions to ensure that each string vibrates at the correct length and produces the right pitch.
To check the saddle curvature, you can use a special tool called a radius gauge, which has a curve that matches the average curvature of most guitar necks. If the saddle doesn’t match the radius gauge, you’ll need to adjust its shape by sanding it down or building it up with a shim.
This can be a delicate process, so it’s important to take your time and make small adjustments until the saddle matches the correct curvature. By doing so, you’ll ensure that your guitar produces accurate intonation and a balanced sound across all strings.
Set action by adjusting saddle height
You’ll want to adjust the saddle height to set the action for your playing style to achieve optimal playability and tone. The action, or the gap between the strings and frets, is a crucial aspect of guitar setup, and can greatly affect how easy or difficult it is to play, as well as the sound quality.
By adjusting the saddle height, you can fine-tune the action to suit your preferences and playing style. Whether you prefer a lower action for faster playing or a slightly higher action for more sustain and clarity, you can achieve the desired action height with a little patience and attention to detail.
To adjust the saddle height, you’ll need to remove the strings and carefully sand down the bottom of the saddle to lower the action, or add a shim or replace the saddle to raise the action. It’s important to measure the action at various points along the neck using a string action gauge and feeler gauges.
Make small adjustments as needed, checking frequently to ensure you achieve the desired action height. Keep in mind that a lower action may cause some buzzing or rattling if played too hard, while a higher action may require more finger strength but can provide better tone and sustain.
Check pickup response
If you’re planning on using your guitar for live performances or recording, it’s important to check the pickup response to ensure that your sound is clear and consistent. This involves plugging your guitar into an amplifier or recording device and playing a few notes to see if the signal is being picked up properly.
If you notice any distortion, feedback, or inconsistency in volume, it may be a sign that your pickups need adjusting. To adjust the pickup response, you can either raise or lower the pickups using the screws on either side of the pickup. Raising the pickups will increase the volume and treble response, while lowering them will produce a mellower tone with less volume.
It’s important to make small adjustments and test the sound frequently until you achieve the desired tone. Additionally, you may want to adjust the pole pieces on your pickups to balance the volume and tone of each string. By taking the time to check and adjust your pickup response, you can ensure that your guitar sounds its best in any situation.
Conclusion
Setting up your acoustic guitar is vital in maximizing its playability, tone, and overall performance. By understanding and implementing adjustments such as string action, intonation, and truss rod adjustments, you can tailor your instrument to suit your playing style and preferences.
Remember, a well-set-up acoustic guitar not only feels more comfortable to play but also produces a more balanced and pleasing sound. So, invest some time and effort into setting up your acoustic guitar, and enjoy the rewarding results that come with a finely tuned instrument.
Related articles:

Świetny wpis, dzięki za info. Temat ciekawy i świetnie pozwalający rozwijać wyobraźnie.
Awsome article and straight to the point. I am not sure if this is truly the best place to ask but do you people have any ideea where to hire some professional writers? Thank you 🙂
Nice blog here! Additionally your site quite a bit up very fast! What host are you using? Can I get your affiliate link in your host? I desire my site loaded up as fast as yours lol
I do not even know how I ended up here, however I thought this submit was great. I do not understand who you are but certainly you are going to a famous blogger in case you aren’t already 😉 Cheers!
What i don’t understood is actually how you’re not actually much more well-liked than you might be now. You’re so intelligent. You realize therefore significantly relating to this subject, produced me personally consider it from so many varied angles. Its like women and men aren’t fascinated unless it’s one thing to do with Lady gaga! Your own stuffs outstanding. Always maintain it up!
I am often to blogging and i really appreciate your content. The article has really peaks my interest. I am going to bookmark your site and keep checking for new information.
hello there and thanks on your info – I have certainly picked up anything new from proper here. I did however expertise several technical points the use of this site, as I experienced to reload the website lots of occasions prior to I could get it to load properly. I had been brooding about in case your web host is OK? No longer that I’m complaining, but sluggish loading cases instances will very frequently have an effect on your placement in google and can injury your quality ranking if advertising and ***********|advertising|advertising|advertising and *********** with Adwords. Anyway I am adding this RSS to my email and could glance out for a lot extra of your respective interesting content. Ensure that you update this again very soon..
hi!,I like your writing very much! proportion we keep up a correspondence more about your post on AOL? I require a specialist on this area to solve my problem. May be that’s you! Taking a look ahead to look you.
Wonderful blog! I found it while searching on Yahoo News. Do you have any suggestions on how to get listed in Yahoo News? I’ve been trying for a while but I never seem to get there! Appreciate it
The next time I read a blog, I hope that it doesnt disappoint me as much as this one. I mean, I know it was my choice to read, however I truly thought youd have something fascinating to say. All I hear is a bunch of whining about something that you would repair in case you werent too busy in search of attention.
There is noticeably a bundle to learn about this. I assume you made sure nice points in features also.
As I website possessor I believe the content matter here is rattling magnificent , appreciate it for your efforts. You should keep it up forever! Best of luck.
I couldn’t resist commenting
Hi there, just became alert to your blog through Google, and found that it’s truly informative. I am gonna watch out for brussels. I will appreciate if you continue this in future. A lot of people will be benefited from your writing. Cheers!
I have been exploring for a little for any high quality articles or weblog posts in this sort of house . Exploring in Yahoo I finally stumbled upon this web site. Studying this information So i’m happy to convey that I’ve an incredibly excellent uncanny feeling I came upon just what I needed. I so much certainly will make certain to do not forget this website and provides it a look regularly.
Everything is very open and very clear explanation of issues. was truly information. Your website is very useful. Thanks for sharing.
Some times its a pain in the ass to read what website owners wrote but this site is very user genial! .
I’ve been absent for a while, but now I remember why I used to love this website. Thank you, I will try and check back more frequently. How frequently you update your site?
We’re a gaggle of volunteers and starting a new scheme in our community. Your site offered us with useful info to paintings on. You have performed a formidable task and our whole neighborhood will likely be thankful to you.
Greetings from Idaho! I’m bored to tears at work so I decided to check out your site on my iphone during lunch break. I really like the information you present here and can’t wait to take a look when I get home. I’m shocked at how fast your blog loaded on my mobile .. I’m not even using WIFI, just 3G .. Anyways, awesome site!
Very clean internet site, appreciate it for this post.
Great beat ! I would like to apprentice while you amend your site, how can i subscribe for a blog site? The account helped me a acceptable deal. I had been a little bit acquainted of this your broadcast provided bright clear idea
You really make it seem so easy with your presentation but I in finding this matter to be actually one thing which I believe I would by no means understand. It kind of feels too complicated and extremely vast for me. I am looking ahead on your subsequent post, I’ll try to get the grasp of it!
Good day very nice web site!! Guy .. Beautiful .. Amazing .. I’ll bookmark your site and take the feeds also…I’m happy to find a lot of useful info right here in the put up, we want work out extra strategies on this regard, thank you for sharing. . . . . .
I view something really special in this web site.
Some truly good articles on this internet site, thanks for contribution. “Be absolutely determined to enjoy what you do.” by Sarah Knowles Bolton.
Wow that was odd. I just wrote an extremely long comment but after I clicked submit my comment didn’t appear. Grrrr… well I’m not writing all that over again. Anyways, just wanted to say superb blog!
Hi, just required you to know I he added your site to my Google bookmarks due to your layout. But seriously, I believe your internet site has 1 in the freshest theme I??ve came across. It extremely helps make reading your blog significantly easier.
Some really great articles on this internet site, appreciate it for contribution.
superb post.Never knew this, thankyou for letting me know.
Hmm is anyone else having problems with the images on this blog loading? I’m trying to determine if its a problem on my end or if it’s the blog. Any feed-back would be greatly appreciated.
What i do not understood is actually how you are not actually much more well-liked than you might be right now. You’re very intelligent. You realize therefore significantly relating to this subject, produced me personally consider it from a lot of varied angles. Its like women and men aren’t fascinated unless it is one thing to accomplish with Lady gaga! Your own stuffs outstanding. Always maintain it up!
Thank you for every other informative web site. The place else may just I get that kind of info written in such a perfect approach? I have a mission that I am just now working on, and I have been at the look out for such information.
You have brought up a very superb details , regards for the post.
Your style is so unique compared to many other people. Thank you for publishing when you have the opportunity,Guess I will just make this bookmarked.
I like this web site so much, saved to favorites.
I am really loving the theme/design of your site. Do you ever run into any browser compatibility issues? A small number of my blog visitors have complained about my blog not operating correctly in Explorer but looks great in Safari. Do you have any solutions to help fix this issue?
Hello.This post was really motivating, particularly since I was looking for thoughts on this matter last Monday.
I’m really enjoying the design and layout of your site. It’s a very easy on the eyes which makes it much more pleasant for me to come here and visit more often. Did you hire out a developer to create your theme? Excellent work!
Some times its a pain in the ass to read what people wrote but this web site is real user friendly! .
It’s actually a nice and helpful piece of information. I’m glad that you just shared this useful information with us. Please stay us informed like this. Thanks for sharing.
It’s really a nice and helpful piece of information. I’m glad that you shared this helpful information with us. Please keep us informed like this. Thanks for sharing.
Very efficiently written information. It will be supportive to anyone who utilizes it, as well as myself. Keep doing what you are doing – looking forward to more posts.
Just about all of the things you mention is astonishingly accurate and that makes me wonder the reason why I hadn’t looked at this in this light before. This particular piece really did switch the light on for me as far as this specific subject matter goes. Nonetheless there is just one position I am not too comfortable with and while I try to reconcile that with the main theme of the point, let me observe just what the rest of your readers have to say.Nicely done.
I truly appreciate this post. I have been looking everywhere for this! Thank goodness I found it on Bing. You’ve made my day! Thank you again
Hello, Neat post. There is a problem together with your web site in web explorer, might test this… IE nonetheless is the market leader and a big component of other people will pass over your magnificent writing due to this problem.
Valuable information. Fortunate me I discovered your site by accident, and I’m surprised why this coincidence didn’t happened earlier! I bookmarked it.
Yeah bookmaking this wasn’t a risky determination great post! .
My brother recommended I might like this blog. He used to be entirely right. This submit truly made my day. You cann’t believe just how a lot time I had spent for this information! Thanks!
I love it when people come together and share opinions, great blog, keep it up.
Great line up. We will be linking to this great article on our site. Keep up the good writing.
Thanks for any other magnificent article. Where else may just anybody get that kind of info in such a perfect manner of writing? I’ve a presentation subsequent week, and I’m on the search for such info.
whoah this blog is great i love reading your articles. Keep up the good work! You know, lots of people are hunting around for this info, you could help them greatly.
Very great visual appeal on this website , I’d rate it 10 10.
Good day! Do you know if they make any plugins to safeguard against hackers? I’m kinda paranoid about losing everything I’ve worked hard on. Any tips?
Thanks , I have recently been looking for info about this subject for a while and yours is the greatest I have discovered till now. But, what about the bottom line? Are you certain concerning the source?
Hi! Someone in my Facebook group shared this website with us so I came to check it out. I’m definitely loving the information. I’m book-marking and will be tweeting this to my followers! Fantastic blog and amazing design and style.
I really appreciate this post. I’ve been looking everywhere for this! Thank goodness I found it on Bing. You have made my day! Thx again
An attention-grabbing discussion is value comment. I feel that it is best to write extra on this subject, it might not be a taboo subject however generally persons are not enough to talk on such topics. To the next. Cheers
Hello there! I could have sworn I’ve been to this website before but after browsing through some of the post I realized it’s new to me. Anyways, I’m definitely glad I found it and I’ll be bookmarking and checking back frequently!
Hi, i read your blog from time to time and i own a similar one and i was just wondering if you get a lot of spam feedback? If so how do you prevent it, any plugin or anything you can suggest? I get so much lately it’s driving me insane so any assistance is very much appreciated.
As a Newbie, I am always exploring online for articles that can benefit me. Thank you
Someone essentially help to make seriously articles I would state. This is the first time I frequented your website page and thus far? I amazed with the research you made to create this particular publish extraordinary. Magnificent job!
Please let me know if you’re looking for a author for your weblog. You have some really good posts and I believe I would be a good asset. If you ever want to take some of the load off, I’d really like to write some articles for your blog in exchange for a link back to mine. Please blast me an e-mail if interested. Many thanks!
I really enjoy studying on this internet site, it contains great articles. “Don’t put too fine a point to your wit for fear it should get blunted.” by Miguel de Cervantes.
Some truly interesting info , well written and broadly speaking user genial.
Hi there, I found your website by the use of Google at the same time as looking for a comparable subject, your site came up, it seems to be great. I’ve bookmarked it in my google bookmarks.
Hi, Neat post. There’s an issue with your web site in internet explorer, might check this?K IE nonetheless is the market chief and a huge part of other folks will leave out your fantastic writing because of this problem.
Some genuinely superb articles on this internet site, thankyou for contribution.
This internet site is my breathing in, very great design and perfect subject material.
Have you ever considered publishing an ebook or guest authoring on other blogs? I have a blog based on the same subjects you discuss and would love to have you share some stories/information. I know my visitors would enjoy your work. If you are even remotely interested, feel free to send me an e-mail.
When I originally commented I clicked the -Notify me when new comments are added- checkbox and now each time a comment is added I get four emails with the same comment. Is there any way you can remove me from that service? Thanks!
Thank you so much for providing individuals with a very terrific possiblity to read critical reviews from here. It can be very useful and as well , stuffed with a good time for me and my office friends to search your site at the very least thrice in 7 days to read through the latest secrets you have got. And indeed, I’m certainly contented concerning the striking points you give. Certain 2 areas in this post are in fact the simplest we have all had.
Hi there I am so grateful I found your webpage, I really found you by accident, while I was looking on Yahoo for something else, Anyways I am here now and would just like to say cheers for a marvelous post and a all round enjoyable blog (I also love the theme/design), I don’t have time to browse it all at the moment but I have saved it and also added in your RSS feeds, so when I have time I will be back to read much more, Please do keep up the awesome job.
I regard something really special in this web site.
Some truly marvelous work on behalf of the owner of this website , dead outstanding content material.
obviously like your website however you need to test the spelling on several of your posts. Several of them are rife with spelling issues and I find it very troublesome to tell the truth however I will definitely come again again.
You are a very clever person!
I just could not go away your site before suggesting that I actually loved the usual information an individual supply on your visitors? Is gonna be again often to check out new posts
I like what you guys are up too. Such smart work and reporting! Carry on the superb works guys I have incorporated you guys to my blogroll. I think it’ll improve the value of my site 🙂
Thanks on your marvelous posting! I quite enjoyed reading it, you could be a great author.I will make certain to bookmark your blog and may come back in the foreseeable future. I want to encourage continue your great job, have a nice weekend!
you are in point of fact a just right webmaster. The web site loading velocity is incredible. It seems that you’re doing any distinctive trick. Furthermore, The contents are masterpiece. you have done a excellent job on this matter!
I like this web blog so much, bookmarked. “American soldiers must be turned into lambs and eating them is tolerated.” by Muammar Qaddafi.
Very interesting topic, thankyou for posting.
You made various fine points there. I did a search on the issue and found most persons will consent with your blog.
I appreciate, cause I found just what I was looking for. You have ended my 4 day long hunt! God Bless you man. Have a great day. Bye
Enjoyed examining this, very good stuff, appreciate it.
Hello there! Do you use Twitter? I’d like to follow you if that would be ok. I’m absolutely enjoying your blog and look forward to new updates.
Oh my goodness! an incredible article dude. Thank you Nonetheless I am experiencing problem with ur rss . Don’t know why Unable to subscribe to it. Is there anyone getting identical rss downside? Anybody who knows kindly respond. Thnkx
Hello! I just would like to give a huge thumbs up for the great info you have here on this post. I will be coming back to your blog for more soon.
I do agree with all the ideas you’ve presented in your post. They’re really convincing and will definitely work. Still, the posts are very short for starters. Could you please extend them a bit from next time? Thanks for the post.
Some truly interesting information, well written and loosely user genial.
Good day! Do you know if they make any plugins to assist with SEO? I’m trying to get my blog to rank for some targeted keywords but I’m not seeing very good success. If you know of any please share. Thanks!
I as well think therefore, perfectly pent post! .
excellent post, very informative. I wonder why the other experts of this sector don’t notice this. You should continue your writing. I am confident, you have a huge readers’ base already!
Hi there very cool site!! Guy .. Beautiful .. Amazing .. I’ll bookmark your blog and take the feeds also?KI am satisfied to seek out so many useful information here within the publish, we’d like develop more strategies on this regard, thank you for sharing. . . . . .
At this time it sounds like WordPress is the preferred blogging platform available right now. (from what I’ve read) Is that what you’re using on your blog?
Hello! I could have sworn I’ve been to this blog before but after browsing through some of the post I realized it’s new to me. Anyways, I’m definitely happy I found it and I’ll be book-marking and checking back frequently!
Would love to perpetually get updated great weblog! .
This design is wicked! You obviously know how to keep a reader entertained. Between your wit and your videos, I was almost moved to start my own blog (well, almost…HaHa!) Great job. I really loved what you had to say, and more than that, how you presented it. Too cool!
Thank you for the good writeup. It in fact was a amusement account it. Look advanced to far added agreeable from you! However, how could we communicate?
I’m not sure why but this site is loading very slow for me. Is anyone else having this problem or is it a issue on my end? I’ll check back later and see if the problem still exists.
Wonderful blog! I found it while surfing around on Yahoo News. Do you have any suggestions on how to get listed in Yahoo News? I’ve been trying for a while but I never seem to get there! Appreciate it
This actually answered my drawback, thank you!
Hello.This post was extremely motivating, especially since I was searching for thoughts on this matter last Wednesday.
Enjoyed reading through this, very good stuff, thankyou. “It is well to remember that the entire universe, with one trifling exception, is composed of others.” by John Andrew Holmes.
Your home is valueble for me. Thanks!…
Very interesting points you have observed, thanks for putting up. “Opportunities are seldom labeled.” by John H. Shield.
The very crux of your writing while sounding reasonable originally, did not settle very well with me personally after some time. Someplace within the sentences you were able to make me a believer but only for a short while. I nevertheless have a problem with your jumps in logic and you might do well to help fill in those gaps. When you actually can accomplish that, I would definitely be impressed.
Hi there, You have performed a great job. I’ll certainly digg it and in my opinion suggest to my friends. I’m sure they will be benefited from this site.
Thank you for another fantastic post. Where else could anyone get that type of info in such an ideal method of writing? I have a presentation next week, and I’m on the look for such info.
Thanks for some other fantastic article. Where else may anybody get that type of information in such an ideal approach of writing? I have a presentation subsequent week, and I am on the look for such information.
Thank you for sharing with us, I conceive this website truly stands out :D.